


Helping you to explore all of the great features in Wikipanion.
- How do I use Queue mode?
- How do I use the page saver for offline and accelerated reading?
- How can I organize saved pages using a folder hierarchy?
How do I use Queue mode?
 Queue mode is one of the great features in Wikipanion Plus, helping you to organize your Wikipedia browsing. To turn Queue mode on or off, you use the Queue mode flipper in the upper left hand corner of the Queue window in Wikipanion Plus. The Queue window is brought up by clicking the queue button in the bottom right toolbar in the main window. Flipping this to the queue mode icon (when it shows stacked pages) enables Queued mode.
 The most important part of Queue mode however is its link clicking behavior. When you click on a link and Queue mode is turned on, the link is added to your queue rather than being visited immediately. This means that you can read through Wikipedia topics and click on links throughout the page to mark topics you would like to read in the future. Do all of this while continuing to read the current entry, without the worry of accidently clicking on a link. When you are done reading the current page, hit the queue button to reveal your queue. Note that even if you are in standard mode, you can still add items to your queue — simply hold your finger down over a link until the add to queue notification pops up, then release your finger.
 Once you visit a queued item, it will be automatically removed from your queue so you don't have to keep track of what you have already read. Don't worry though, all pages you have visited are added to your history. Your history can be accessed through the bookmarks button in the search bar.
 Additionally there are two other useful hidden features built in to Queue mode. If at any time you wish to open a link directly without adding it to the queue, hold your finger down on a link until the direct visit notification appears before releasing your finger. Additionally, you can open the first item in the queue automatically by holding down the queue button until the visit directly notification appears. Then the top queue item will be visited without you having to open up the queue window.
The amount of time you must hold your finger down ("long tap time") before various hold features activate can be controlled in the iPhone's settings, under Wikipanion Plus.
The Queue mode in Wikipanion Plus for the iPad lets you organize your browsing without the need for inefficient solutions like tabs and multiple windows. By default Wikipanion Plus lets your browse Wikipedia like you are used to in the standard version of Wikipanion, that is, clicking on a link takes you to the article you have clicked on. To add a link to your queue, click on a link and hold your finger down until a popup shows up — the popup will show the title of the page you are adding to the queue and a queue icon, indicating that you are adding this page to the queue. Note that this popup will display either near the top of the window or the bottom of the window depending on where in the page the link is located that you have clicked on.
Now to visit pages in the queue either click on the queue icon in the toolbar at the top of the screen (that's the icon with the multiple stacked pages and the eye), or the queue icon at the top of the side browser in landscape mode. This will display the queue. Clicking on any of these items will load the appropriate article. Note that the item may not disappear immediately — Wikipanion removes the item from the queue only after the page has fully loaded. This is to prevent pages from ever being lost in case Wikipanion enounters a problem loading the page.
You may have noticed a toggle switch in the upper left corner of the queue panel. This switch lets you turn on and off the advanced queue mode. The advanced mode is off when you see the icon of a single page, and on when you see the stacked page icon. When advanced queue mode is turned on, single clicks on article links add pages directly to the queue. In order to visit a page directly, click and hold on the link until a popup appears. The popup will show a "play" symbol along with the article name you will be visiting to indicate that you are now loading a different article.
How do I use the page saver for offline and accelerated reading?
 There are two easy ways to save pages for offline reading. To save the current page you are reading, visit the bookmarks area. Do this by clicking the bookmark icon in the search bar. If you are already editing text in the search bar, simply hit the clear button on the right side, which will then cause the bookmark icon to be revealed. Then change to the saved pages tab (the far right one with the download button), and hit the plus button in the upper right hand corner. This is also where you can manage your saved pages and remove them as necessary.
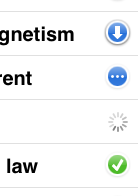 The second easy way to save pages for offline reading involves performing all of your browsing in queue mode. This is the most powerful method. Hit the queue button in the lower right hand corner (see "How do I use Queue mode?" above), and then press the "Save Pages" button. At this point the items in your queue that are not already marked for download will display a download icon. Click on each entry's download button to mark the entry for downloading, which will begin immediately if Wikipanion isn't already in the process of downloading other pages. Or, click the "Save Entire Queue" button to batch mark all pages in your queue for downloading.
Wikipanion Plus can also act as a reading accelerator — the "Auto Download" option can automatically download items for you for offline reading. When you enable auto download, you are prompted with a choice for one of two modes. The "Delete" mode will automatically delete pages that have been automatically downloaded after you visit them. Note that it will not delete pages that you have opted to manually save, and you can choose to save the page permanently as long as you are still reading that page. The other mode is "Save" mode, where all entries that are downloaded are kept permanently on the iPhone (until you manually delete them through the saved page manager window, accessible through the blue bookmarks button in the search bar). If you choose the wrong mode, simply turn off auto downloading and turn it on again and the prompt will reappear.
Of course the easiest way to save pages for offline reading is to open the bookmarks pane and then click on the saved pages button in the bottom right hand corner. Then you can hit the plus button and the page you are reading will be immediately saved for reading at a later point in time. However Wikipanion provides a much better way to automatically save pages.
The second page saving functionality is integrated with the queuing function. This means that you must use the queue for this secondary feature to function. With this mode turned on, Wikipanion will automatically download any page that is added to the queue. This means that when you go to visit the queue, the page loads quickly and without additional network access.
Enable this mode by opening the queue pane and clicking the text in the lower right hand corner reading "Save Pages". Then, in the upper left hand corner click the "Auto Download" button. Wikipanion will prompt you with two options — you can either having Wikipanion automatically delete the auto downloaded page after you have read it, or have Wikipanion keep the page around in your saved pages after it has been read. Note that this option only affects pages automatically downloaded through this feature. If you choose the wrong option or change your mind later about what you want, simply turn off auto download and turn it back on for the prompt to reappear.
How can I organize saved pages using a folder hierarchy?
You can organize your manually saved pages by using the bookmark page saving function. Rather than clicking on the plus button in the saved pages pane, you can click on the plus button in the bookmarks pane to add a bookmark. Then slide the "save" option to "on," which will save the page and bookmark it at the same time. You can organize this bookmark in any sort of folder structure you want, similar to Mobile Safari.